GitHub started using a custom font for their icons. Totally my taste. I try to get by without graphics as much as I can myself. Of course, that’s partly because of me being bad at creating them. But it’s also because it has its advantages:
We try to leverage CSS3 techniques like rounded corners, gradients, and @font-face across all pages of the site. This allows us to focus more on what we can render in the browser, and less on images. This results in better page loads and an overall better experience for you.
Not only are we concerned with speed, but also clarity. With the introduction of new retina screen products, we realize that it’s more important than ever to have our site beautiful at any zoom level.
Recently, I upgraded NZ Walks Info to Rails 3 and Ruby 1.9.3. In order to run this new setup successfully, I needed to upgrade the Ruby version on the server. I chose ruby-build and the rbenv Ruby Version Manager to do so and would like to share some simple instructions that worked for me.
The Setup
I am running the site on a Linode server running Ubuntu Linux 10.04. Here’s the software I use:
Ruby 1.8.7: installed system-wide using apt-get, located in /usr/lib/ruby
Ruby was going to be upgraded to version 1.9.3 while the other parts stayed the same. However, Passenger 3 needed to be reinstalled to work with the new version of Ruby installed via rbenv.
Installing Ruby 1.9.3 on Ubuntu 10.04 using rbenv
I found this Gist by Ben Woodward with instructions on how to install rbenv system-wide. I figured, when installing it like this I would less likely run into permission problems.
Here’s the essential part of the Gist, adjusted to install Ruby 1.9.3:
Now I needed to update Passenger to work with the new version of Ruby. All there was to do was to install the passenger gem, following the instructions on their website:
At the end of the installation, I got the configuration lines to paste into the Apache2 config file. I replaced my old settings with these updated ones:
The only thing that was missing to be able to deploy my Rails 3/Ruby 1.9 version of my app was to install Bundler:
gem install bundler
Done
This was all that needed to be done to upgrade the Ruby version on my Linux/Ubuntu system using rbenv. I hope these instructions will help someone else, too.
Knock Out Rails & Rack Apps Like a Superhero.
Pow is a zero-config Rack server for Mac OS X. Have it serving your apps locally in under a minute.
Usually, there’s no configuration needed at all, but in order to get my old Rails 2.3.x apps running, I needed to “rackup” all of these. Following the Rails Guides instructions, I had to create a config.ru file with the following contents:
# RAILS_ROOT/config.ru
require "config/environment"

use Rails::Rack::LogTailer
use Rails::Rack::Static
run ActionController::Dispatcher.new
Then I was good to go.
Unless…
When I tried to symlink the app in the ~/.pow directory - as described on the pow homepage - I got the following error:
~/.pow $ ln -s /path/to/myapp
ln: ./: File exists
But that was easy. I just had to add the name of the symlink explicitly:
~/.pow $ ln -s /path/to/myapp myapp
Now, I was really up and running with my Rails 2.3.x apps and pow. Bye bye Passenger.
(Be sure to have a look at the documentation. It’s the best source code documentation I’ve ever seen.)
When I am creating a new feature for an app, I sometimes realize halfway through that the way I am building it, is not the proper way to do so. Or the specification changes. Or there was a misunderstanding. Or there’s an unexpected bug that needs to be fixed and go onto the production server as soon as possible.
Then, when you did all development on the main branch (we use Git, so that’s the master branch in that case), undoing things and/or doing a quick deployment can get very inconvenient. You can’t just deploy a quick bug fix, because all other half-finished features and fixes would have to be deployed, too. You can’t easily revert the existing commits for that feature, especially if the commits are mixed with all the other commits of unrelated features.
A good way to get rid of this problem is to create a local feature branch every time you want to work on a new feature. That branch doesn’t need to be pushed to the remote repository on the server. It’s just for you.
Then, all development for that feature happens in this branch exclusively. For every new feature a new branch is created. After a feature has been implemented completely, merge it back to the master branch (or whatever branch is appropriate). With Git, that’s super easy:
# create a new branch new_feature based on master and switch to it
git checkout -b new_feature master

# when you're done, merge it back
git checkout master
git merge new_feature

# when you are sure everything is working properly
# and no further work needs to be done for this feature,
# you can delete the feature branch again:
git branch -d new_feature
Too often I thought, “I won’t need an extra feature branch for that”. But all it takes is one simple Git command to create one (and it’s probably equally simple in other modern DVCSes). It will make your life easier when coding new features.
Bonus tip
If you decide you want to discard all the development on a particular branch, except for one or two commits, you can cherry pick these commits from the discarded branch:
# say, you have a commit 'bd42c4e7' you would like to keep
# switch to the branch you want to copy the commit to
git checkout master

# copy it
git cherry-pick bd42c4e7
The Mix and Mash competition is about creating useful and beautiful mashups and remixes with open data from New Zealand institutions.
My entry is a website to find information about all NZ walking/tramping/hiking tracks: http://nzwalksinfo.co.nz/.
Motivation
The minute I saw that the Department of Conservation made available all the geo data of their walking tracks and huts, I knew I wanted to build a website with this data.
The main idea of the site is to get relevant information on walking tracks in a very visual way. While there are lots of tramping websites already (including the excellent website of the DOC itself), I always found it quite tedious to get to some important information quickly - if it was provided at all.
Here are some of the questions I ask myself quite often and that I think are tedious to answer with existing sites:
What tracks are available near my current location or a location I’m interested in visiting?
Will it be stressful with a lot of ups and downs?
Will I only walk through forest or will I have some nice views along the way?
While I haven’t answered all of these question to my full satisfaction, yet, I think this first version is a very good starting point.
The elevation profile for example was a top priority for me, because it’s so important in my opinion. But yet I can’t find this information most of the time. The DOC makes some elevation profiles available, but only for very few tracks and then you have to get a brochure from a DOC office or download the PDF file.
Future development
Of course, I wanted to do more for this entry, but I ran out of time. I think the site is useful already (eh… obviously ;-)), but it can become a lot more useful in the future while sticking to a simple, uncluttered user interface.
I have lots of ideas and I hope I can implement them in the months to come. Winning the competition definitely is plenty of fuel for my motivation.
Mix and Mash is great
I love the idea behind the competition and I think all entries show that it’s a brilliant idea for NZ institutions to make their data available freely. I think it is a great success. Please check out all the other exciting entries on the Mix and Mash website.
Thank you for this awesome competition. It makes the internet better.
Great update for one of my favorite iPad apps, including a new feature I have been waiting for (length & progress indicators). But what really strikes me with this update and blog post, is to see how much thought goes into Instapaper’s features and Marco’s attention to detail.
Just look at the section about the new automatic dark mode preference:
You can now have Instapaper automatically use dark mode at night and normal (light) mode during the day.
But how, exactly, do you define “night”? There’s no API access to the iPhone’s ambient light sensor, so I can’t just enable dark mode in dark rooms.
And I can’t just define hour boundaries, because 8 PM in December is much darker than 8 PM in June.
And I can’t just look at hours and the date, because 5 PM in December is much darker in Alaska than in Costa Rica.
So I used with the most reliable method I could think of: sunset times in your location. Yes, Instapaper is now location-aware, but only for this feature.
I love this.
For example, he could have presented that slot-machine-ish control to the user to set the time range when it’s dark. He didn’t and I think that’s awesome, because it makes it almost effortless for the user to use the feature. And it’s very clever.
During the weekend of October 16th and 18th, I participated in the Rails Rumble 2010 coding competition. The exercise was to build a web app from scratch in 48 hours using Ruby and Rails.
Our team consisted of 3 people: Tim, Falk and myself.
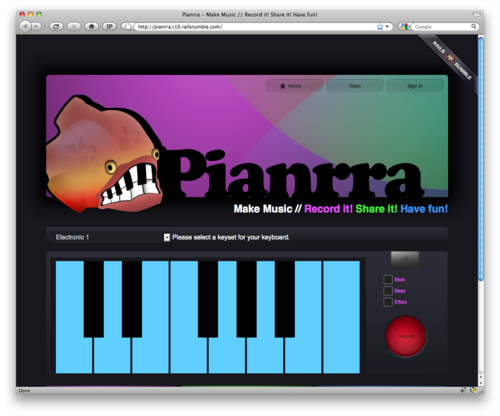
The app we produced: Pianrra - An online keyboard with recording and playback functionality.
It was a rather spontaneous decision to participate. Falk and I joined Tim - who had registered ealier - only one week before the competition started. Then the planning and prototyping started.
The main reason we participated was to have fun, build something interesting and get smarter (although a little fame and a prize wouldn’t have bothered us, either). That’s also the reason why we chose to implement this particular idea of an online keyboard. It was the most unusual, risky, and exciting idea of all the ones we discussed in the week before the Rumble.
The Rails Rumble is a great exercise in collaboration - especially when you work with a team as distributed as ours. Tim and Falk were working from two different cities in Germany while I was hacking away in New Zealand.
Here are some of my insights.
Plan ahead
You can plan a lot of your project beforehand. This is crucial. When all of the planning is done before the competion, you can fully concentrate on the implementation during the 48 hours.
You aren’t allowed to produce any production ready code or graphics, but there is still plenty you can do. Here are some suggestions of what to think about:
What app are you going to produce?
What technologies/plugins are you going to use?
How’s the user interface going to look like? Create Sketches!
How are your users going to interact with the site? What’s the workflow?
What is your database model going to look like?
What name do you give your product?
Everything you can plan in advance, should be. Unfortunately we didn’t have the time to do so and decided a lot of things during the competition. So there is definitely much room for improvement next time.
Write it down
When you plan all this stuff, write it down! Use a tool of your choice where your team can collaborate easily. This is especially important if you’re not sitting in the same room during the competition.
We used Basecamp to do so and I think it helped a lot. Writing it down helped to clarify the vision for the project (‘What exactly are we going to build?’) and helped to agree on the technologies we are going to use. It definitely eliminated most (if not all) of the existing misunderstandings among the team members.
Additionally, create a list of to-dos and assign each of them to a specific person. It helped us to stay focused, agree on features and - this might seem obvious, but really isn’t - everybody knows what everybody else is doing. (Again, this is especially important if you only collaborate online).
For me, in order for a project to be successful, good communication is essential. And writing down goals, tools, features, to-dos etc. was and is an important part.
UI is important
Rails Rumble confirmed to me again, that the UI is the most important part of the software. What are all your amazing features worth when almost nobody can figure out how to use them? Right. Not much.
I won’t say that it was that bad in our case, but we certainly had quite a number of confused users. We made quite a few quick decisions during the competition (especially towards the end) and these obviously weren’t the best. We also struggled with finishing on time and so certain features and improvements didn’t make it. Additionally we also had to deal with more or less unexpected browser and OS incompatibilities. If we had planned beforehand, this would have been less of on issue.
So: get your UI, workflow and copywriting right!
There’s a lot of competition during Rails Rumble and people simply don’t have the time and/or energy to figure stuff out for every app. I know this from myself: I looked at every of the other 179 apps, and when something wasn’t clear to me, didn’t work etc. I just moved on to the next one.
Conclusion
Altogether it was great fun. Sometimes stressful and exhausting, but still fun. We learned a lot and successfully delivered a working application. I am really looking forward to next year’s edition.
This nice little Ruby library/gem/plugin is a great helper when you need to execute long running tasks from the terminal.
As the name suggests, it displays the progress of the task and even gives you an ETA for when it thinks it will be done.
Check their examples:
In the context of computing, a polyglot is a computer program or script written in a valid form of multiple programming languages, which performs the same operations or output independently of the programming language used to compile or interpret it.
Here’s more from this article:
The two most commonly used techniques for constructing a polyglot program are to make liberal use of languages which use different characters for comments and to redefine various tokens as others in different languages.
Weird stuff. Check out the example of the article to see such a “thing”.
Support all browsers to some degree – focus first on the latest and greatest browsers, and then go back and make sure that older browsers look and work reasonably well.
This reflects precisely my approach to creating a website/webapp. I love the new features of CSS3 so much, because they enable me - as a developer - to create a decent UI without having to mess around in Photoshop or write tedious, non-semantic markup just to create good looking buttons, rounded corners etc. The design is implemented quicker, is flexible and the site loads faster, too.
The idea here is to begin with a nice, well-styled presentation that looks good in even archaic browsers like IE6. This is a good thing because even visitors using crappy browsers will be able to read and interact with your content. But instead of stopping there, progressive enhancement says, “let’s provide some additional features for people using better browsers.” After all, people using awesome browsers like Firefox, Safari, and Opera want the best experience possible from the Web. Progressive enhancement says, “let’s give it to them, but only after the less-capable crowd has been taken care of first.”
Unfortunately, when you have a lot of IE users and want to present your site in the best possible way, you have to bite the bullet and create all those buttons and rounded corners in Photoshop.
But I think the ‘progressive enhancement’ method is the best thing you can do. You can offer the best possible visual experience for those who use the latest and most advanced browsers at relative low costs. And for those who use older browsers - well, they probably do not care that much about having the best possible experience on the web anyway.
Altogether, the article is a good read and also provides practical information on the new CSS3 techniques - some of which you might not have heard of yet.