When you browse the web for information on film cameras, you’ll occasionally – or even regularly – stumble upon websites that look very dated. One example I recently came across was a site that offers scans of film camera manuals in PDF format: the “Camera Manual Library”.
The sub-heading states “1997 – 2018”. And it definitely looks like being from the former of those two years: It makes use of table layouts, <font>- and <marquee>-tags, old-school animated GIFs, <body>bgcolor- and link-attributes and much more. A proper blast from the web’s childhood past.
But you know what? It still works today. Twenty or so years after it was originally created. It gets the job done without any fancy new tech. And without the need for anyone to update its markup and design over the years. That’s pretty remarkable, if you ask me! Good luck using your apps in just a few years.
Recently, my Leica Mini Zoom compact camera wasn’t able to rewind a film after reaching the end of the roll. The result was that the film was stuck inside. Eventually, I managed to get it out again.
As most – if not all – electronic consumer film cameras, the Leica Mini Zoom automatically rewinds the film when it reaches its end. This time that wasn’t the case, probably because I used a bulk-loaded film. I can only guess what the exact reason was. But I suspect it was the way I taped the strip of bulk-film to the little bit of original film of a pre-used canister of HP5. And this then confused the rewind mechanism and prevented it from doing its thing.
The problem was that the take up spool was still locked and wouldn’t even let me pull off the film strip manually.
Preparations
For my attempts to rescue the film, I first put the camera into a dark bag, so it was safe to open the camera without exposing the film. I also put into the bag a drawing pin – to press in the tiny rewind button – and a developing tank – so that I could place the film directly in there after freeing it (and hence continuing to shield it from light).
I didn’t have any luck with the drawing pin and the rewind button: the camera would only pull the film further onto the take-up spool, and wouldn’t unlock the spool, either.
The solution
What was successful in the end was this: I first cut off the film from the canister. Then I pushed the film further into the camera and onto the take up spool until I only had a little bit of film left to hold on to 1. The take up spool didn’t move while doing this, so this step was loosening the tension of the film on it. Then I pulled on the film using a little bit of force as I reached the tension point again. And this forceful pulling managed to retrieve a few more centimetres of film each time2. Repeating these steps, I was able to recover more and more of the stuck film strip. And eventually the take up spool unlocked and I could simply pull off the remaining film in one last go.
Originally, I had the film taken up completely by the spool after cutting it off and pushing the rewind button again. But after pushing it a few times more, I was able to grab a short bit of film again and start with the described recovering steps. ↩︎
The pulling did make the material protest in form of a bit of cracking noise. But I (hope I) didn’t overdo it. The camera still seems to work. ↩︎
I wouldn’t say that everything I’ve published so far really qualifies as “writing”, but that’s ok. My goal is more to publish at least a little bit of originally written text every day, and build a new habit.
And once again, I find that writing is one of those things that seem easy, but when you actually do it, it really isn’t.
It feels intimidating to still having eleven months to go, but I remain optimistic. As I mostly do.
Please display the publishing date of your articles or blog posts on the page. It regularly drives me crazy, when there is none.
For some content, it might not be as important, but for a lot of articles it’s very relevant whether they were written one month, one year, or one decade ago.
Ideally, put it right at the top of the post, around its heading (I just updated this very blog and did just that). Then nobody has to scroll through the whole article first to find it.
And please be unambiguous: include year, month and probably the day, too. Definitely don’t skip the year, or at least make it clear, that when there’s no year printed, you mean the current.
Today I got a wisdom tooth removed. I’m just grateful that we live in times of modern anaesthetics. Didn’t want to have to go through this procedure on Whiskey alone.
They only had time for one of the two teeth that are causing problems, so next week I have another appointment…
While I am speaking of Zoe: she is so much fun at the moment! She’s walking and running, she’s talking (sort of, in her toddler way), she’s dancing, she’s cuddly, she understands a lot of what we say, she’s curious, and – to our great delight – she started giving out kisses, too. 😍
Spent most of the day with dad clearing out our cellar and his old stockroom and driving all the things to various recycling facilities.
Things finally had to go.
I don’t think I am required to do any additional sports this week.
And the highlight of my day was returning home: I’m currently rarely gone for an entire day, which is probably why Zoe was so happy to see me again. She gave me the biggest and longest hug I’ve received from her ever. Best thing in the world! :-)
On both my Mac and my iOS devices, I use Safari as my main browser. It’s fast, secure, prevents tracking, syncs across platforms and makes the best use of the underlying OS’s resources and hence helps with long battery life. And since it recently gained the ability to show favicons on each tab, there’s not much I’m missing.
Ideally though, I would use Mozilla’s Firefox. It’s just as good. And furthermore, it’s developed by a not-for-profit organisation and the only major browser – complete with its own rendering engine Gecko – that’s not maintained by one of the enormous global for-profit corporations. Which is good for the diversity of the browser landscape and the web as a platform.
What’s holding me back, though, is that I can’t specify a different default browser on iOS. Yes, I enjoy seemingly best battery life using Safari, but I would trade this for using an independent browser. But it’s pretty inconvenient to have links always open in Safari when my main browser is actually something else.
While it’s shitty enough1 that Apple doesn’t allow different rendering engines on iOS2, it seems deliberately anticompetitive they don’t allow you to specify another default browser.
Can’t someone force Apple to make this change, please?
And regarding Google’s Chrome (which is the browser with the biggest market share): I can’t think of a reason to use it as my main browser. For me, it doesn’t offer anything better than Safari or Firefox and it’s from a company I have low trust in.
One of the biggest advantages for me when shooting film is that after taking the photo, there’s nothing to see. Neither I nor anyone else can see the photo I just took. This keeps me and everyone else in the moment.
With film, it’s clear you can’t see the image immediately. And so nobody wonders or asks. No checking possible of how something or someone looks in the photograph. It’s less intrusive compared to a camera with a screen.
That makes film perfect for me when capturing moments with family and friends: because in these settings I’m a participant first and a photographer second.
Beer empty. Films developed.
I was a little bit nervous this time: Because I had rated the HP5s at EI 3200 – a 3-stop push – and I have only done that once before a couple of years back. But the negatives came out looking really good!
While pouring and waiting and agitating I listened to Rick Rubin.
Didn’t manage to finish the article I originally intended to publish. Instead, I spent too much time today on some custom map tiles implementation for an app. But it’s Friday night. I should start fresh on Monday.
I think I’ll now have a beer and develop the two rolls of 120 film from December I have still lying around.
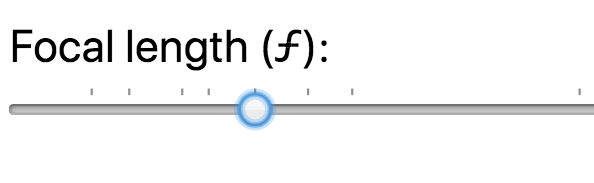
The datalist can specify input values as an <option> element. Supporting browsers – like Chrome for example – use this information to put little marks along the top of the range slider to indicate positions (= values) of particular interest.
I use this feature to mark common focal lengths in the 35mm format: 10 mm, 16 mm, 24 mm, 28 mm, 35 mm, 43 mm, 50 mm, 85 mm, 100 mm, 135 mm, and 200 mm.
What’s even cooler, is that Chrome lets the input’s handle snap to these positions.
Here’s a enlarged screenshot of what it looks like:
For my Focal Length Equivalent utility, I created a alternative view for when you don’t have JavaScript enabled (as you should, if you can).
Instead of dynamically showing the conversion based on the position of the range slider input element, I simply show a good old table with calculated equivalents at pre-defined focal lengths.
I wanted this table to list the focal lengths vertically – with one film- or sensor-format on one row – so you can easily parse the result. As such a table gets easily too wide for the parent elements container, I wanted
the table to be scrollable horizontally and
have the format name headings keep their position, so that you never lose track of which row represents which format.
The “scrolling” bit is easily done: simply put a overflow-x: scroll; on the table’s container element, which in my case is a <figure> element (a <div> or any other block element would also do of course, if the <figure> semantic doesn’t work for you):
figure {
  overflow-x: scroll;
}
In order for the film-format name headings to keep their position, I resorted to a fairly new value of the CSS position property: sticky. I added this to the th selectors, in combination with left: 0; so the headings stay at their original positions:
figure table tr th {
  position: sticky;
  left: 0;
  // you might also want a bg color, so the th covers the table
  // that scrolls through underneath
  background-color: white;
}
You can take a look at this when you go to the tool and disable JavaScript in your browser. Or you can simply look at this table here:
I recently cleaned up my Mac to free up disk space. And the best bang for the buck was from reclaiming disk space from Xcode and its tools. I got back several gigabytes.
So, if you use Xcode and you are in need of some disk space, here are a few directories where I’d look to see what you no longer need: