The process of choosing my blogging software was quite a long one. I read articles on blogging software and did a lot of testing, before I decided for one candidate.
In the end it came down to whether self-hosting my own installation of Wordpress or using Tumblr, which I don’t have to host myself.
As you can see, I decided to go with Tumblr.
Here is the whole story.
My requirements
I had some preferences to what the software should be capable of. Here are these preferences somewhat sorted by priority.
I wanted (as far as possible):
to use my own domain name,
a clean and simple, fully or mostly customizable theme,
an XMLRPC interface for blogging directly from Textmate.
Eliminating alternatives
I really would prefer not to host the software myself - despite the fact, that I already pay for a shared hosting package where the blogging software would easily fit onto and it is no problem for me to 'handle’ the technical stuff of setting everything up.
I have this preference simply because I don’t want to deal with maintaining and scaling the software/server.
So I looked at the most popular hosted blogging services first, starting with the one I’m most familiar with:
I quickly realised that none of them was for me. Wordpress and Typepad charge me for things that are high on my requirements list (f.e. custom CSS or using your own domain) and Blogger just didn’t feel right1; and I couldn’t find out quickly if Blogger offers custom CSS at all.
So I thought 'why not go with hosting the software myself’?
I already pay for the webspace anyway and this way I could do whatever I want.
I chose Wordpress for this, because that’s the platform I’m most familiar with and made good experiences with in the past. I also looked at Movable Type, but that appeared to be even more bloated than Wordpress, so I didn’t consider it seriously2.
Hey, but what’s with Tumblr?
At this stage I didn’t even consider Tumblr. Maybe because it was not on my mind and maybe because I thought this is more for so-called tumblelogs. Looking back, I don’t know why I didn’t consider it right from the beginning.
Hey, what’s with alltheothers?
There’s lots of blogging software/services out there and I can’t try all of them. I had a look at some of them, but when they didn’t appeal to me or I didn’t know much about them, I didn’t bother trying them out.
Setting it all up
First, I installed Wordpress on my webspace, downloaded a nice theme and configured everything to my liking. I was very impressed by Wordpress 2.8 and how easy it is with this version to browse for and install plugins and themes directly from the admin interface. Wordpress makes it very easy to set everything up and to customize your blog.
Then, I became interested in Tumblr again3. I had a closer look at what they have to offer and discovered, that they offer a lot of what I care about without charging extra. So I signed up.
After setting up both Wordpress and Tumblr, a long period of testing began and I out-weighted the pros and cons of both systems.
Which one would better suit my requirements?
Less is more
As a matter of fact, Wordpress would better suit my requirements!
And at that point, I thought that this is the only way to go for me: I am in full control - all the time.
There is nothing I could do with Tumblr that I couldn’t do with Wordpress. In fact, I could do more with Wordpress!
In my opinion, this is the biggest advantage of a self-hosted Wordpress installation over Tumblr; but this is also the biggest disadvantage.
Right from the moment I signed up, I was impressed by Tumblr’s user interface (UI) and its user experience in general: the guidance through the registration process, the clarity of the whole admin interface, the clear focus on publishing content easily.
The more I tested it, the more I liked it.
And as an addition to the spot-on UI, customization of your blog is dead-easy. For some customizations of your theme - like colours or custom CSS - you often don’t have to get into the code of the theme. But even this is simple and a lot easier than with Wordpress.
Tumblr gives you just enough possibilities to customize your blog. This way, you can stay focused on publishing important articles like this one and don’t end up tuning your theme/plugins/widgets all the time.
I had some serious doubts about choosing Tumblr over Wordpress along the way: navigation is not that easy and customizable as in Wordpress, no static pages, no picture uploads for text posts and the general fear of not being in full control.
But Tumblr’s ease of use and its slim interface easily makes up for those disadvantages.
Tumblr has a lot I want and I am confident that the developers will come up with even more great stuff in the future4 while still keeping it simple.
If you want a blog, give Tumblr a try. It’s great!
1. I need to eliminate alternatives quickly in an early stage. That’s highly subjective, unscientific and you might think differently about Blogger.
2. I used Movable Type in the past, too; and also liked it. But more from a blogger/writer perspective. I never set up and administered a Movable Type blog.
3. I don’t know exactly why, but probably because I like the blog of the guy who created it and/or I liked their signup screen very much.
4. And they do: they recently enabled picture uploads in text posts. I was very pleased! Even though these pictures are scaled down without offering a full-size version, it’s still very nice to have.
And: you need a comment system, Daniel ;-)! Reblogging seems a bit heavy for leaving comments to me.
Doesn’t toto with karakuri look tempting to you?
toto and karakuri do look interesting but not really tempting at the moment. It’s just gives me more stuff to fiddle around with. While I like that, it just prevents me from focusing on the actual purpose of a blog. Tumblr just feels right for me.
Concerning comments, I think this post (not mine) sums it up nicely:
The reblog function allows some sort of commentary but also puts a cost on the commenter. I can reblog somebody’s comment, but my response now goes on my tumblelog with all the other things I put there. If I have something valuable to add, I will add it. If all I have is something stupid ([…]) I won’t bother leaving a comment. It is sort of like a comment—but I have to have it on my tumbelog for everybody to read. By increasing the cost of leaving a comment, reblogging eliminates comments left by people who know they are stupid.
However, I agree that it sometimes is a bit heavy to reblog for a comment. But if you follow me on tumblr, you can leave a reply via the dashboard, which will then show up in the notes.
We have been lucky. We weren’t in Christchurch when the 6.3 earthquake hit just before 1pm on Tuesday, Feb. 22nd 2011. We were hiking through the mountains near Glenorchy/Queenstown (approx. 400km away to the south-west).
A hut warden was present on this track and he told us on Wednesday morning what has happened. He also offered us to make one call via radio (there’s no cell-phone coverage in NZ’s mountains). The connection was short, but we managed to reach our neighbours to ask if they are ok and if their and our houses are still standing.
Everything was ok, and so we went ahead with the normal plan and continued walking for the next couple of days.
Only after we came back on Saturday, we realized the degree of destruction this earthquake caused. It was terrible to see all the pictures.
We drove home on Sunday only to grab a few things and then leave again. We didn’t feel safe in our house on the hill, although it wasn’t looking bad on the outside. The inside was a bit of a mess, but we expected things to be worse.
At first, we spent two nights on a campground in western Christchurch, before my company organised flights for us to Auckland. We ended up staying there for almost 3 weeks in an unfurnished flat. It was not exactly comfortable, but still more comfortable than being in Christchurch, having no running water and sometimes no power. No shaking was a big bonus, too.
We returned last Sunday. Wednesday evening I went out with my GF1 to take some pictures of the visible damage in Sumner, the suburb we live in.
I need to say that most buildings are looking ok and that you don’t see lots of obvious major damage everywhere. But you certainly won’t overlook it, either.
Recovering after the earthquake: The time on the Sumner clocktower is the one when the earthquake happend. Just before 1 PM.
You see quite a few of these Port-a-loos in the street. Water was not available first (it is restored now), and the sewage system is still not running properly again.
Sumner Church had some considerable damage after the quake in September, and the Febuary one made it worse.
Water tank: before running water was restored, you had to get water from one of these tanks.
A huge rock came down from the cliff in the background.
The Cornershop Bistro. Awesome restaurant where we spent a lovely evening not long ago.
“The Ruptured Duck” restaurant was heavily damaged after the September quake and this one now put it over the edge. It was still standing after the quake, but got demolished now.
zrick buildings are often hit worst.
Some properties are now a bit too close to the edge.
I recently got a new MacBook Air at work.
Thanks to the increasing number of tools like iCloud, Dropbox and GitHub I can store and backup more and more of my digital stuff online. This makes setting up a new Mac from scratch pretty effortless. And so I did.
I thought it would be interesting to write down what third-party apps are essential for me to get work done. Here’s the list:
Dropbox
Apart from music, photos and code, I store all my documents here. This also includes my bash profile and gitconfig dotfiles to set up the respective tools.
Very soon, I’m going to stop forwarding this blog’s RSS feed to Feedburner.
Everything should just keep working. And if you’re subscribed, you should continue to receive updates. But if you don’t, you can visit blog.danielpietzsch.com and grab the feed’s link again from the bottom of the page.
A while back, I started sharing my stuff more-or-less exclusively through my blog on my own domain.
I wanted to have a single web-presence where I can share all my content: be it photos, texts, videos, links or whatever else. I wanted to have control over how it’s displayed and where (the URLs of my own domain).
I think the trigger was my frustration with the fleetingness of corporate third-party services. They were (and are) getting neglected, moving in a direction I was not happy with, or getting acquired by Facebook, which I try to avoid as much as I can.
So, I thought, instead of putting a lot of work into sites that I can’t control, I’d rather put it into my own website on my own domain.
I just wanted something more reliable and permanent.
I still wanted to continue using these third-party services, though. I wanted my connections on these sites to be able to continue following me there. But I didn’t want to have to rely on these services as much as before. I wanted the canonical source of my content to be my blog.
So, I continued (and I am going to continue) posting copies of my content to Flickr, Twitter and all the other services that I use, but this posting happens automatically most of the time and always through my blog1.
And that’s why I was excited when I heard about the idea of the IndieWeb. I think I first heard it from Jeremy Keith at the Decentralize-Camp last year.
The best way to explain what it’s about, is to just quote their website:
What is the IndieWeb?
The IndieWeb is a people-focused alternative to the ‘corporate web’.
Your content is yours
When you post something on the web, it should belong to you, not a corporation. Too many companies have gone out of business and lost all of their users’ data. By joining the IndieWeb, your content stays yours and in your control.
You are better connected
Your articles and status messages can go to all services, not just one, allowing you to engage with everyone. Even replies and likes on other services can come back to your site so they’re all in one place.
You are in control
You can post anything you want, in any format you want, with no one monitoring you. In addition, you share simple readable links such as example.com/ideas. These links are permanent and will always work.
I’m now slowly but certainly moving more and more in that direction.
While I currently use Tumblr as my blogging platform – which hardly counts as an independent tool – I still think it is not that much of a contradiction to the IndieWeb principles. Tumblr allows you to host your blog on your own domain – and I believe that this is the main point of the IndieWeb. Whether you host the website yourself comes second, in my opinion. If Tumblr went away – or I wanted to move away from it – I could still switch to host my own site, but – crucially – I could keep all the URLs.
This whole approach has been serving me well for quite some time now. And I’ll continue refining the design of my blog to better cater for this style of sharing and to implement more of the IndieWeb building-blocks.
This is called POSSE (“Publish (on your) Own Site, Syndicate Elsewhere”) in IndieWeb terms, and I achieve this either via Tumblr’s sharing tools or IFTTT. ↩︎
Over the last couple of days, I created my first Tumblr theme to give this site a little refresh. My major focus was typography and a more simple and more semantic markup.
I’ll continue to improve and refine the theme, but I think the major bits are all done. Take a look, if you haven’t already!
The reason for my little hiatus here, is that I was hiking the Soonwaldsteig with Andre the last extended weekend. And I was only shooting film. Then I got sick.
So, photos are queuing up a little bit here. I’m scanning the negatives from the trip now, so that I can start sharing again shortly.
We don’t have a flat anymore and are living in the camper full time now. Since we’re both self-employed/freelancers and have been working from home for the last year, we thought we could do the work from a mobile home just as well – at least in theory. In practice, time will tell, but so far it has worked out.
We’re planning to evenly split our time for work and play and dedicate approx. 50% to each on average. I guess this percentage will vary, though, depending on each of our workloads at any given time.
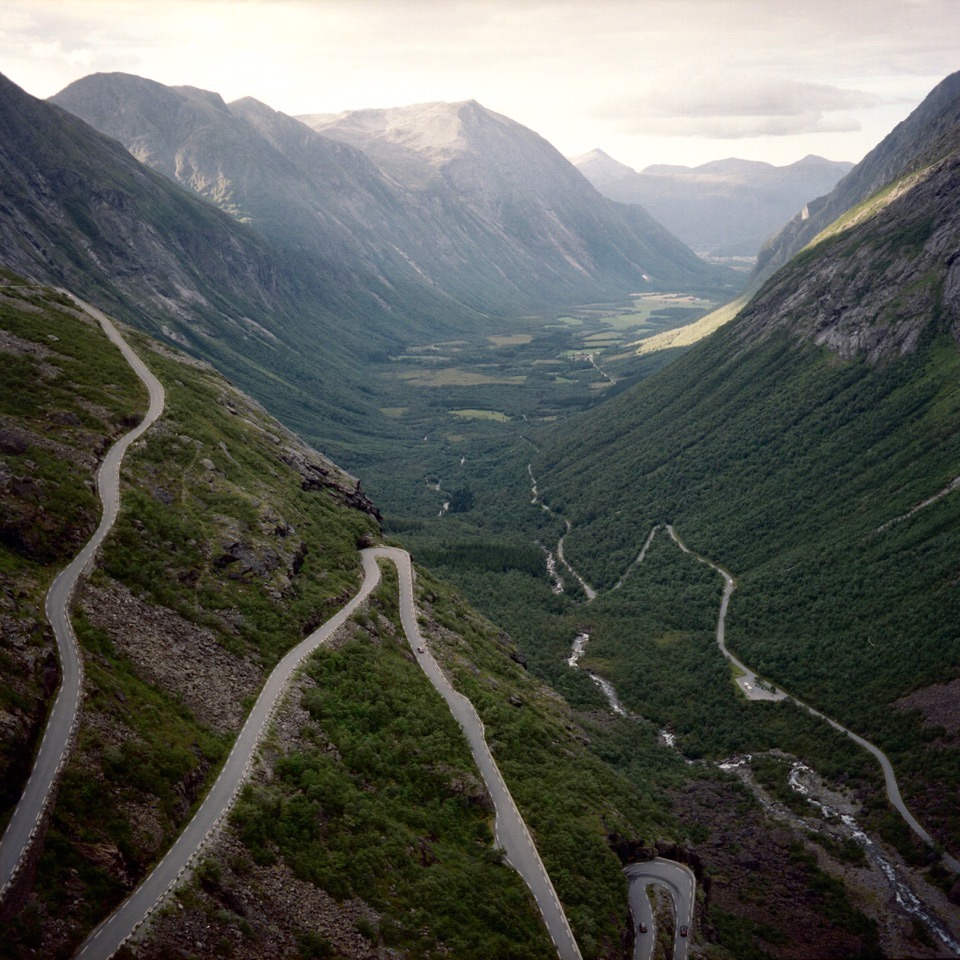
Our plan for the rest of this year is to travel mostly in Norway and Sweden. If you’d like to follow us, you can do so, on our reactivated German travel blog over at danielandnicole.net. There you’ll get the latest infos on our whereabouts and travel experiences etc.
And here, I’ll probably simply continue with the regular flow of not-so-recent (film) photos and other miscellaneous posts.
I’ve been working on this blog’s design again. The biggest change is that it’s now responsive – meaning it adapts to different screen sizes, from big to small. When you are visiting this site from your smartphone, you used to be seeing Tumblr’s default mobile design – now you’ll see my own.
Further amendments:
It’s now a black & white theme.
No more Tumblr Photoset rendering. I simply render all images full-size and inline, one after another.
It supports iOS’ “Dynamic Type” feature. That means, this theme will adjust its font size based on your iOS device’s text size settings (in case you use this feature).
Of course, it’s not perfect in every corner of the site. But I’m pretty happy with it for now.
This blog now has an option to enable a “dark mode”. Meaning, you can see everything on a dark background. Just click or tap the checkbox next to the little moon (🌙) in the top right corner. Your browser will remember the setting the next time you visit – which I hope you will.
The dark background is much gentler on the eyes when looking at your screen in a dark surrounding and generally nicer for looking at photos. And since that’s the content I post most frequently, I might even make this “dark mode” the default in the future. But for now, it’s an option.
The technical background
I’ve had this separate “dark mode” for a while now. But since it had no user interface (UI) on this site, it could only be discovered and enabled, when the browser recognized alternate stylesheets and itself offered a UI to switch between them. Of the major browsers, I think that’s only Firefox’ desktop version – at least on a Mac. And even then I think most folks don’t know about – or use – this.
Searching online for some help, I found this ancient article by Paul Snowden on the A List Apart website from 2001. While dated, it still was describing pretty much what I wanted: a little script to switch between alternate stylesheets of a website (as opposed to – for example – toggling class names on the <body> tag or something similar). I couldn’t and didn’t want to use the author’s script as is. But the article gave me the hint that <link> and <style> tags have a disabled attribute which I can use to enable or disable them. So off I went to write a little script that does these four things:
Make the UI visible – in this case a checkbox plus label – to toggle the stylesheets (because in case JavaScript is disabled, there’s no need to render the UI, since you couldn’t use it anyway).
When the checkbox is toggled, loop through all relevant <link> and <style> tags and enable or disable styles accordingly to the current setting.
Store the name of the enabled stylesheet in the browser’s localStorage to be able to retrieve the preference for future visits (and further navigation).
Read the preference from localStorage on page load to enable the visitor’s preferred style.
Here’s the whole script:
function switchStyles(enabledStyleTitle, disabledStyleTitle) {
  var links  = document.getElementsByTagName("link")
  var styles = document.getElementsByTagName("style")

  for (var i = 0; i < styles.length; i++) {
    if      (styles[i].getAttribute("title") == disabledStyleTitle) { styles[i].disabled = true }
    else if (styles[i].getAttribute("title") == enabledStyleTitle)  { styles[i].disabled = false }
  }

  for(var i = 0; i < links.length; i++) {
    if (links[i].getAttribute("rel").indexOf("style") != -1 && links[i].getAttribute("title") == disabledStyleTitle) { links[i].disabled = true }
    // I don't exactly know why I seem to need to "double-toggle" this here. But on WebKit-based browsers, it wouldn't apply the appropriate style on first page load. And this seems to do the trick.
    else if (links[i].getAttribute("rel").indexOf("style") != -1 && links[i].getAttribute("title") == enabledStyleTitle)  { links[i].disabled = false; links[i].disabled = true; links[i].disabled = false; }
  }

  localStorage.preferredStyle = enabledStyleTitle
}

function switchStylesBasedOnChecked() {
  if (styleSwitchCheckbox.checked) {
    switchStyles("Dark", "Light (default)")
  } else {
    switchStyles("Light (default)", "Dark")
  }
}

// START HERE
var styleSwitchCheckbox = document.getElementById("style-switch")
 styleSwitchCheckbox.parentElement.style.visibility = 'visible'

// simply "check" the checkbox when the user's stored preference was "Dark"
if (localStorage.preferredStyle == "Dark") { styleSwitchCheckbox.checked = true }

// On page load, making sure the correct setting is applied
switchStylesBasedOnChecked()

// Whenever the checkbox changes, switch styles again
styleSwitchCheckbox.addEventListener('change', function(event) { switchStylesBasedOnChecked() })
Feel free to use this script yourself – unmodified or modified.
I also like to high-five the person or team who was responsible for the localStorage API. So straightforward, I almost couldn’t believe it.
I haven’t posted any new photos in a while now. That’s because I’ve gotten a little tired of the social media style of posting one or a handful of photos at a time.
But I haven’t stopped taking lots and lots of – mostly analog – photos. And I’ve also been busy working on a new home for them.
On this new site, I plan to create one entry per month. Each does and will include lots of images, documenting what I do and see.
Currently I’ve added August and September 2016, which contain mostly new photos, starting with only a few known ones I’ve uploaded here in recent posts.
I have been wanting a site where I can post lots of photos at once for quite some time now. I have been enjoying these longer, chronological posts by other photographers, and it’s become my favourite way of consuming images. For me, it’s way more enjoyable to really take my time and look at a single person’s photographs, than consuming single images of several different photographers – which is usually the default on social media. It’s more like sitting down with a photography book of a single artist.
Currently I’m very much into personal and documentary photography, and I think longer posts lend themselves better to this style.
Plus, I enjoy creating these posts with photos covering a longer time span much more.
I also wanted to have full control over my photos, my site and the way I’d like to present and archive them. I wanted something Indie. And hosting your own site is the only way to do so.
Now I can have everything the way I want: no limit on the number of images, and simply a long page where you can scroll through full-size pictures – chronologically and without the need to click or tap anything. I can also easily (batch-)download all the images and posts, since it’s simply an FTP download of a static website.
It’s interesting how I more and more go back to hosting my own sites again and also code lots of it myself. That’s how I started out in the late 90s. But I think it’s the only way I can control the things I share on the web long-term. It feels like my photos found a real “home” again. A homepage for my photos. This feels very right to me.