The process of choosing my blogging software was quite a long one. I read articles on blogging software and did a lot of testing, before I decided for one candidate.
In the end it came down to whether self-hosting my own installation of Wordpress or using Tumblr, which I don’t have to host myself.
As you can see, I decided to go with Tumblr.
Here is the whole story.
My requirements
I had some preferences to what the software should be capable of. Here are these preferences somewhat sorted by priority.
I wanted (as far as possible):
to use my own domain name,
a clean and simple, fully or mostly customizable theme,
an XMLRPC interface for blogging directly from Textmate.
Eliminating alternatives
I really would prefer not to host the software myself - despite the fact, that I already pay for a shared hosting package where the blogging software would easily fit onto and it is no problem for me to 'handle’ the technical stuff of setting everything up.
I have this preference simply because I don’t want to deal with maintaining and scaling the software/server.
So I looked at the most popular hosted blogging services first, starting with the one I’m most familiar with:
I quickly realised that none of them was for me. Wordpress and Typepad charge me for things that are high on my requirements list (f.e. custom CSS or using your own domain) and Blogger just didn’t feel right1; and I couldn’t find out quickly if Blogger offers custom CSS at all.
So I thought 'why not go with hosting the software myself’?
I already pay for the webspace anyway and this way I could do whatever I want.
I chose Wordpress for this, because that’s the platform I’m most familiar with and made good experiences with in the past. I also looked at Movable Type, but that appeared to be even more bloated than Wordpress, so I didn’t consider it seriously2.
Hey, but what’s with Tumblr?
At this stage I didn’t even consider Tumblr. Maybe because it was not on my mind and maybe because I thought this is more for so-called tumblelogs. Looking back, I don’t know why I didn’t consider it right from the beginning.
Hey, what’s with alltheothers?
There’s lots of blogging software/services out there and I can’t try all of them. I had a look at some of them, but when they didn’t appeal to me or I didn’t know much about them, I didn’t bother trying them out.
Setting it all up
First, I installed Wordpress on my webspace, downloaded a nice theme and configured everything to my liking. I was very impressed by Wordpress 2.8 and how easy it is with this version to browse for and install plugins and themes directly from the admin interface. Wordpress makes it very easy to set everything up and to customize your blog.
Then, I became interested in Tumblr again3. I had a closer look at what they have to offer and discovered, that they offer a lot of what I care about without charging extra. So I signed up.
After setting up both Wordpress and Tumblr, a long period of testing began and I out-weighted the pros and cons of both systems.
Which one would better suit my requirements?
Less is more
As a matter of fact, Wordpress would better suit my requirements!
And at that point, I thought that this is the only way to go for me: I am in full control - all the time.
There is nothing I could do with Tumblr that I couldn’t do with Wordpress. In fact, I could do more with Wordpress!
In my opinion, this is the biggest advantage of a self-hosted Wordpress installation over Tumblr; but this is also the biggest disadvantage.
Right from the moment I signed up, I was impressed by Tumblr’s user interface (UI) and its user experience in general: the guidance through the registration process, the clarity of the whole admin interface, the clear focus on publishing content easily.
The more I tested it, the more I liked it.
And as an addition to the spot-on UI, customization of your blog is dead-easy. For some customizations of your theme - like colours or custom CSS - you often don’t have to get into the code of the theme. But even this is simple and a lot easier than with Wordpress.
Tumblr gives you just enough possibilities to customize your blog. This way, you can stay focused on publishing important articles like this one and don’t end up tuning your theme/plugins/widgets all the time.
I had some serious doubts about choosing Tumblr over Wordpress along the way: navigation is not that easy and customizable as in Wordpress, no static pages, no picture uploads for text posts and the general fear of not being in full control.
But Tumblr’s ease of use and its slim interface easily makes up for those disadvantages.
Tumblr has a lot I want and I am confident that the developers will come up with even more great stuff in the future4 while still keeping it simple.
If you want a blog, give Tumblr a try. It’s great!
1. I need to eliminate alternatives quickly in an early stage. That’s highly subjective, unscientific and you might think differently about Blogger.
2. I used Movable Type in the past, too; and also liked it. But more from a blogger/writer perspective. I never set up and administered a Movable Type blog.
3. I don’t know exactly why, but probably because I like the blog of the guy who created it and/or I liked their signup screen very much.
4. And they do: they recently enabled picture uploads in text posts. I was very pleased! Even though these pictures are scaled down without offering a full-size version, it’s still very nice to have.
I find the recent discussion about Google’s Chrome OS and other operating systems/netbook solutions like Litl or HyperSpace very interesting.
The idea to use a computer as a thin client ‘just’ to access the web is really great. All your data is stored on the internet and all you use are web applications to accomplish your tasks.
I think there is a huge potential for these type of OSes although it’s not (yet) suitable for everyone.
Who will use it?
I believe there are millions of users out there that have a personal computer and only use it for doing stuff on the internet. And even if they do something else, using a classic desktop application - like writing the occasional letter in MS Word f.e. - there is already a web application for this.
These users don’t need an expensive, full-featured computer with lots of storage and processing power to accomplish their tasks.
The huge advantage that web applications have, is that users don’t have to install anything. It’s easy, works everywhere and you don’t have to worry about the hardware. You also don’t have to deal with anything malicious like viruses or malware, either. It just works! And that is what these users want and need.
With Offline Web Applications coming with the HTML5 specification, this doesn’t even make the computer useless when you don’t have an internet connection available all the time. Of course, you won’t be able to chat with your friends while offline, but you still can write that e-mail you would like to send later or improve and finish the document you’re currently working on.
As shown in the demo of Chrome OS, you even can work with images from your digital camera and store them on the internet using an appropriate service. I believe a lot of users don’t process their images anyway and also share them anyway. So why store it on your local machine?
Even if they did process some of their images, they may also be satisfied with a less powerful online image editor like f.e. Picnik.
When selling these netbooks and their OSes, there might be a challenge of convincing these users to store everything on the web. But I don’t think that this is too hard to do: they already store a lot of data on the web, so why not store everything else there, too?
I think that’s even more secure for them, because I believe a lot of people don’t do regular backups. With every document stored in the cloud, they don’t have to worry about this, because the service provider is probably very serious about backups and availability unless he wants to ruin his business easily.
Netbooks and OSes like Chrome are cheap, easy to use and maintenance-free. That is perfect for people who use a computer to access the internet.
Who will not use it?
These OSes and netbooks are not made for people that need lots of storage capacity, processing power and/or desktop apps that make use of this.
To only name a few of these tasks, you are not able to manage and listen to your music library, process and sort photos professionally, or f.e. make a music or video production on a netbook. Software development is also not easily possible on a netbook. At least not yet.
The future
I am really curious what the future will bring up. When an internet connection will be available everywhere, be lightning-fast, reliable and affordable and there are also affordable services for storing all of your gigabytes of data in the cloud, we all might only be using netbooks exclusively one day.
You will pay for your software on a monthly subscription basis and your data is available everywhere you go, no matter what device you use to access the internet.
But all this is really far away, I guess.
Right now, I think thin clients in form of netbooks, running a slim, secure OS like Chrome, Litl or HyperSpace are a great alternative for users that spend 100% of their time on the internet when they use a computer, and for users as a secondary machine when they don’t need the power and versatility of a full-featured laptop or desktop computer.
Last weekend, I tried out an iPod touch for the first time - and had one of those (rare) moments when software makes me smile…
One of the things I wanted try was the software keyboard. So I went to Twitter and produced a short tweet.
While typing, I quickly noticed that there’s no dot (.) amongst the visible keys. “Well”, I thought, “they wouldn’t have just forgotten such an important sign!” And: “The most straight forward thing would be to hit ’Space’ twice for a dot…”
And Boom! There was a dot. Great! :-)
When your website’s content is so long that you expect most of your users will have to scroll to read/see the whole page and you have a search field (or other textfield) on that page, please stop setting the focus on that.
It’s just annoying when you read an article and can’t use the keyboard to scroll without having to click on some ‘non-clickable’ area first.
In 99% I do not want to search for anything on your site! I just want to read that article.
I have collected some initial tips for this blog now and thought it would be time to write something about the blog itself. So, here we go…
Do you know these moments when you talk to fellow programmers, read a blog article or book and suddenly discover a neat, new trick you haven’t seen or used, yet?
This blog is all about this! It’s meant to collect all those little new Ruby & Rails commands and tricks you have learned about.
Don’t expect this blog to teach you about Ruby and/or Ruby on Rails from scratch, though; it’s random and intended to be used as way to quickly discover new snippets of Ruby code.
All the tips are quicktips, which means they are short, practical and mostly lack some context and detailed explanation. However, I always link to sources which explain the commands of each tip in more detail.
I constantly learn new stuff about Ruby and Rails from the sources mentioned above and I thought it would be a good idea to share what I learned with the public, so you can benefit, too. While this is totally awesome already, it’s even better when more people participate…
Submit your tips
Let’s make this site the most awesome collection of Ruby and Rails Quicktips on the web! Your help is essential and very appreciated!
And don’t be afraid to submit something you think is trivial or maybe too complicated or specific; Ruby Quicktips is for developers of all skill levels! All you have learned is worth sharing and will probably help some of your fellow programmers, too.
You can comment on every tip on this blog. Please do so, if you discover an error, have an improvement to en existing tip or just want to leave a nice comment.
Very rarely, I need to create my own global settings inside my Rails apps. If you want these settings to be different for each environment (development, test, production), you can use a YAML file to do so.
As I always need to look up how that works, I finally created a Gist, so I can look it up more quickly.
This movie contains a lot of these long scenes without cut. Two of those immediately got my attention. But first, here’s some context on what the movie is about:
Set in the United Kingdom of 2027, the film explores a grim world in which two decades of global human infertility have left humanity with less than a century to survive. Societal collapse, terrorism, and environmental destruction accompany the impending extinction. Meanwhile, the United Kingdom—perhaps the last functioning government—persecutes a seemingly endless wave of illegal immigrant refugees seeking sanctuary. In the midst of this chaos, Theo Faron (Clive Owen) must find safe transit for Kee (Claire-Hope Ashitey), a pregnant African “fugee” (refugee).
The first scene, I’d like to share is the 'roadside ambush’:
[Director Alfonso] Cuarón’s initial idea for maintaining continuity during the roadside ambush scene was dismissed by production experts as an “impossible shot to do”. Fresh from the visual effects-laden Harry Potter and the Prisoner of Azkaban, Cuarón suggested using computer-generated imagery to film the scene. [Cinematographer Emmanuel] Lubezki refused to allow it, reminding the director that they had intended to make a film akin to a “raw documentary”. Instead, a special camera rig invented by Gary Thieltges of Doggicam Systems was employed, allowing Cuarón to develop the scene as one extended shot. A vehicle was modified to enable seats to tilt and lower actors out of the way of the camera, and the windshield was designed to tilt out of the way to allow camera movement in and out through the front windscreen. A crew of four, including the DP and camera operator, rode on the roof.
Even longer is a scene “in which [main character] Theo is captured by the Fishes, escapes, and runs down a street and through a building in the middle of a raging battle”:
The creation of the single-shot sequences was a challenging, time-consuming process that sparked concerns from the studio. It took fourteen days to prepare for the single shot in which Clive Owen’s character searches a building under attack, and five hours for every time they wanted to reshoot it. In the middle of one shot, blood splattered onto the lens, and cinematographer Emmanuel Lubezki convinced the director to leave it in. According to Owen, “Right in the thick of it are me and the camera operator because we’re doing this very complicated, very specific dance which, when we come to shoot, we have to make feel completely random.”
Now watch this. It’s one take until the 6 minute mark.
That’s just amazing, even if you read that the final product doesn’t seem to be one single shot:
However, the commonly reported statement that the action scenes are continuous shots is not entirely true. Visual effects supervisor Frazer Churchill explains that the effects team had to “combine several takes to create impossibly long shots”.
I had some problems installing the heroku gem on Leopard:
$ sudo gem install heroku
Building native extensions.  This could take a while...
ERROR:  Error installing heroku:
    heroku requires json_pure (>= 1.2.0, < 1.5.0, runtime)
So I tried to install the json_pure gem first (sudo gem install json_pure), but this always seemed to install/update the json gem instead of the json_pure gem.
I eventually managed to install the correct gem by providing the version number on installation:
sudo gem install json_pure -v 1.2.4
This installed the json_pure gem and I was also able to install the Heroku gem afterwards.
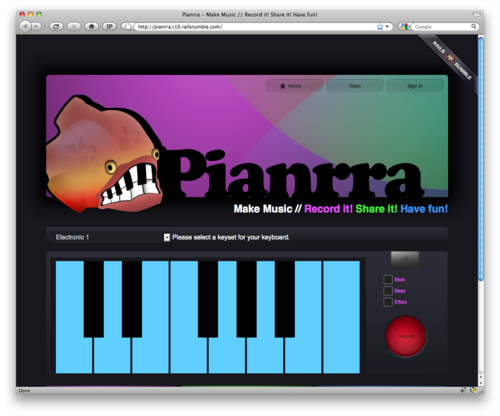
During the weekend of October 16th and 18th, I participated in the Rails Rumble 2010 coding competition. The exercise was to build a web app from scratch in 48 hours using Ruby and Rails.
Our team consisted of 3 people: Tim, Falk and myself.
The app we produced: Pianrra - An online keyboard with recording and playback functionality.
It was a rather spontaneous decision to participate. Falk and I joined Tim - who had registered ealier - only one week before the competition started. Then the planning and prototyping started.
The main reason we participated was to have fun, build something interesting and get smarter (although a little fame and a prize wouldn’t have bothered us, either). That’s also the reason why we chose to implement this particular idea of an online keyboard. It was the most unusual, risky, and exciting idea of all the ones we discussed in the week before the Rumble.
The Rails Rumble is a great exercise in collaboration - especially when you work with a team as distributed as ours. Tim and Falk were working from two different cities in Germany while I was hacking away in New Zealand.
Here are some of my insights.
Plan ahead
You can plan a lot of your project beforehand. This is crucial. When all of the planning is done before the competion, you can fully concentrate on the implementation during the 48 hours.
You aren’t allowed to produce any production ready code or graphics, but there is still plenty you can do. Here are some suggestions of what to think about:
What app are you going to produce?
What technologies/plugins are you going to use?
How’s the user interface going to look like? Create Sketches!
How are your users going to interact with the site? What’s the workflow?
What is your database model going to look like?
What name do you give your product?
Everything you can plan in advance, should be. Unfortunately we didn’t have the time to do so and decided a lot of things during the competition. So there is definitely much room for improvement next time.
Write it down
When you plan all this stuff, write it down! Use a tool of your choice where your team can collaborate easily. This is especially important if you’re not sitting in the same room during the competition.
We used Basecamp to do so and I think it helped a lot. Writing it down helped to clarify the vision for the project (‘What exactly are we going to build?’) and helped to agree on the technologies we are going to use. It definitely eliminated most (if not all) of the existing misunderstandings among the team members.
Additionally, create a list of to-dos and assign each of them to a specific person. It helped us to stay focused, agree on features and - this might seem obvious, but really isn’t - everybody knows what everybody else is doing. (Again, this is especially important if you only collaborate online).
For me, in order for a project to be successful, good communication is essential. And writing down goals, tools, features, to-dos etc. was and is an important part.
UI is important
Rails Rumble confirmed to me again, that the UI is the most important part of the software. What are all your amazing features worth when almost nobody can figure out how to use them? Right. Not much.
I won’t say that it was that bad in our case, but we certainly had quite a number of confused users. We made quite a few quick decisions during the competition (especially towards the end) and these obviously weren’t the best. We also struggled with finishing on time and so certain features and improvements didn’t make it. Additionally we also had to deal with more or less unexpected browser and OS incompatibilities. If we had planned beforehand, this would have been less of on issue.
So: get your UI, workflow and copywriting right!
There’s a lot of competition during Rails Rumble and people simply don’t have the time and/or energy to figure stuff out for every app. I know this from myself: I looked at every of the other 179 apps, and when something wasn’t clear to me, didn’t work etc. I just moved on to the next one.
Conclusion
Altogether it was great fun. Sometimes stressful and exhausting, but still fun. We learned a lot and successfully delivered a working application. I am really looking forward to next year’s edition.
The Mix and Mash competition is about creating useful and beautiful mashups and remixes with open data from New Zealand institutions.
My entry is a website to find information about all NZ walking/tramping/hiking tracks: http://nzwalksinfo.co.nz/.
Motivation
The minute I saw that the Department of Conservation made available all the geo data of their walking tracks and huts, I knew I wanted to build a website with this data.
The main idea of the site is to get relevant information on walking tracks in a very visual way. While there are lots of tramping websites already (including the excellent website of the DOC itself), I always found it quite tedious to get to some important information quickly - if it was provided at all.
Here are some of the questions I ask myself quite often and that I think are tedious to answer with existing sites:
What tracks are available near my current location or a location I’m interested in visiting?
Will it be stressful with a lot of ups and downs?
Will I only walk through forest or will I have some nice views along the way?
While I haven’t answered all of these question to my full satisfaction, yet, I think this first version is a very good starting point.
The elevation profile for example was a top priority for me, because it’s so important in my opinion. But yet I can’t find this information most of the time. The DOC makes some elevation profiles available, but only for very few tracks and then you have to get a brochure from a DOC office or download the PDF file.
Future development
Of course, I wanted to do more for this entry, but I ran out of time. I think the site is useful already (eh… obviously ;-)), but it can become a lot more useful in the future while sticking to a simple, uncluttered user interface.
I have lots of ideas and I hope I can implement them in the months to come. Winning the competition definitely is plenty of fuel for my motivation.
Mix and Mash is great
I love the idea behind the competition and I think all entries show that it’s a brilliant idea for NZ institutions to make their data available freely. I think it is a great success. Please check out all the other exciting entries on the Mix and Mash website.
Thank you for this awesome competition. It makes the internet better.
When I am creating a new feature for an app, I sometimes realize halfway through that the way I am building it, is not the proper way to do so. Or the specification changes. Or there was a misunderstanding. Or there’s an unexpected bug that needs to be fixed and go onto the production server as soon as possible.
Then, when you did all development on the main branch (we use Git, so that’s the master branch in that case), undoing things and/or doing a quick deployment can get very inconvenient. You can’t just deploy a quick bug fix, because all other half-finished features and fixes would have to be deployed, too. You can’t easily revert the existing commits for that feature, especially if the commits are mixed with all the other commits of unrelated features.
A good way to get rid of this problem is to create a local feature branch every time you want to work on a new feature. That branch doesn’t need to be pushed to the remote repository on the server. It’s just for you.
Then, all development for that feature happens in this branch exclusively. For every new feature a new branch is created. After a feature has been implemented completely, merge it back to the master branch (or whatever branch is appropriate). With Git, that’s super easy:
# create a new branch new_feature based on master and switch to it
git checkout -b new_feature master

# when you're done, merge it back
git checkout master
git merge new_feature

# when you are sure everything is working properly
# and no further work needs to be done for this feature,
# you can delete the feature branch again:
git branch -d new_feature
Too often I thought, “I won’t need an extra feature branch for that”. But all it takes is one simple Git command to create one (and it’s probably equally simple in other modern DVCSes). It will make your life easier when coding new features.
Bonus tip
If you decide you want to discard all the development on a particular branch, except for one or two commits, you can cherry pick these commits from the discarded branch:
# say, you have a commit 'bd42c4e7' you would like to keep
# switch to the branch you want to copy the commit to
git checkout master

# copy it
git cherry-pick bd42c4e7
We have been lucky. We weren’t in Christchurch when the 6.3 earthquake hit just before 1pm on Tuesday, Feb. 22nd 2011. We were hiking through the mountains near Glenorchy/Queenstown (approx. 400km away to the south-west).
A hut warden was present on this track and he told us on Wednesday morning what has happened. He also offered us to make one call via radio (there’s no cell-phone coverage in NZ’s mountains). The connection was short, but we managed to reach our neighbours to ask if they are ok and if their and our houses are still standing.
Everything was ok, and so we went ahead with the normal plan and continued walking for the next couple of days.
Only after we came back on Saturday, we realized the degree of destruction this earthquake caused. It was terrible to see all the pictures.
We drove home on Sunday only to grab a few things and then leave again. We didn’t feel safe in our house on the hill, although it wasn’t looking bad on the outside. The inside was a bit of a mess, but we expected things to be worse.
At first, we spent two nights on a campground in western Christchurch, before my company organised flights for us to Auckland. We ended up staying there for almost 3 weeks in an unfurnished flat. It was not exactly comfortable, but still more comfortable than being in Christchurch, having no running water and sometimes no power. No shaking was a big bonus, too.
We returned last Sunday. Wednesday evening I went out with my GF1 to take some pictures of the visible damage in Sumner, the suburb we live in.
I need to say that most buildings are looking ok and that you don’t see lots of obvious major damage everywhere. But you certainly won’t overlook it, either.
Recovering after the earthquake: The time on the Sumner clocktower is the one when the earthquake happend. Just before 1 PM.
You see quite a few of these Port-a-loos in the street. Water was not available first (it is restored now), and the sewage system is still not running properly again.
Sumner Church had some considerable damage after the quake in September, and the Febuary one made it worse.
Water tank: before running water was restored, you had to get water from one of these tanks.
A huge rock came down from the cliff in the background.
The Cornershop Bistro. Awesome restaurant where we spent a lovely evening not long ago.
“The Ruptured Duck” restaurant was heavily damaged after the September quake and this one now put it over the edge. It was still standing after the quake, but got demolished now.
zrick buildings are often hit worst.
Some properties are now a bit too close to the edge.
Knock Out Rails & Rack Apps Like a Superhero.
Pow is a zero-config Rack server for Mac OS X. Have it serving your apps locally in under a minute.
Usually, there’s no configuration needed at all, but in order to get my old Rails 2.3.x apps running, I needed to “rackup” all of these. Following the Rails Guides instructions, I had to create a config.ru file with the following contents:
# RAILS_ROOT/config.ru
require "config/environment"

use Rails::Rack::LogTailer
use Rails::Rack::Static
run ActionController::Dispatcher.new
Then I was good to go.
Unless…
When I tried to symlink the app in the ~/.pow directory - as described on the pow homepage - I got the following error:
~/.pow $ ln -s /path/to/myapp
ln: ./: File exists
But that was easy. I just had to add the name of the symlink explicitly:
~/.pow $ ln -s /path/to/myapp myapp
Now, I was really up and running with my Rails 2.3.x apps and pow. Bye bye Passenger.
(Be sure to have a look at the documentation. It’s the best source code documentation I’ve ever seen.)
Recently, I upgraded NZ Walks Info to Rails 3 and Ruby 1.9.3. In order to run this new setup successfully, I needed to upgrade the Ruby version on the server. I chose ruby-build and the rbenv Ruby Version Manager to do so and would like to share some simple instructions that worked for me.
The Setup
I am running the site on a Linode server running Ubuntu Linux 10.04. Here’s the software I use:
Ruby 1.8.7: installed system-wide using apt-get, located in /usr/lib/ruby
Ruby was going to be upgraded to version 1.9.3 while the other parts stayed the same. However, Passenger 3 needed to be reinstalled to work with the new version of Ruby installed via rbenv.
Installing Ruby 1.9.3 on Ubuntu 10.04 using rbenv
I found this Gist by Ben Woodward with instructions on how to install rbenv system-wide. I figured, when installing it like this I would less likely run into permission problems.
Here’s the essential part of the Gist, adjusted to install Ruby 1.9.3:
Now I needed to update Passenger to work with the new version of Ruby. All there was to do was to install the passenger gem, following the instructions on their website:
At the end of the installation, I got the configuration lines to paste into the Apache2 config file. I replaced my old settings with these updated ones:
The only thing that was missing to be able to deploy my Rails 3/Ruby 1.9 version of my app was to install Bundler:
gem install bundler
Done
This was all that needed to be done to upgrade the Ruby version on my Linux/Ubuntu system using rbenv. I hope these instructions will help someone else, too.