
My current iPhone homescreen
My current iPhone homescreen
I recently subscribed to Rdio. What an amazing new(ish) music service.
For NZD 13.90 a month - less than the price of one album on iTunes - I can pretty much listen to anything. I don’t have to own it and everything is streamed in excellent quality (256 kbps MP3 files) to my MacBook, my iPad and my iPhone. I can even download albums and songs to my mobile devices to enjoy offline or on-the-go.
The software is great, too. Signing up, setting up, navigating, discovering, listening, using - everything is top notch. I regularly catch myself listening to music on Rdio, although it’s in my iTunes library and I wouldn’t have to stream it. It’s just more convenient.
What I particularly like is the “Queue”, to which I can constantly add new albums to and don’t have to worry that it stops playing.
Of course, there are things that could be better. My biggest complaint is the unavailability of quite a few albums due to licensing restrictions. Although I very rarely find an album they don’t have in their catalogue at all, sometimes albums are just not available in New Zealand at this point. I really hope that gets better over time.
Other features I would like to see are the ability to rate/like/favorite songs as well as Airplay support for the Mac Desktop app.
But all in all, Rdio is amazing value for money. And for me, it makes discovering and listening to music fun again without having to ponder on what albums I am going to spend money on next.
We are all going to die. To remind you not to waste your life, here are 5 good articles I came across recently for you to read:
For many years I worked in palliative care. My patients were those who had gone home to die. […] When questioned about any regrets they had or anything they would do differently, common themes surfaced again and again. Here are the most common five.
Regrets of the Dying - Bronnie Ware
There’s a common misconception that work is necessary. You will meet people working at miserable jobs. They tell you they are “making a living”. No, they’re not. They’re dying, …
Don’t work. Be hated. Love someone. - Adrian Tan
I believe I’m as happy as it is possible to be. […] This is a happiness I wish on everyone alive. The question then is, what are the factors that contribute to my happiness?
as happy as possible - Leo Babauta
I was having a discussion with an entrepreneur neighbor about how we might best raise our kids to think for themselves and be successful, instead of thinking like everyone else and confusing “getting a job” or “building a career” with success.
Risk: You have to be willing to lose to win - Ken Rockwell
But not everybody thinks this way. What we think is obvious, others find to be amazing.
Lessons Learnt from Derek Sivers and Thomas Edison - Benjamin Spall
I recommend you read them all.
Some detailed information on how Aperture and Photo Stream work together. For example, I recently wondered how RAW files are handled:
According to the Aperture documentation, how RAW interacts with Photo Stream isn’t immediately obvious — but it is very important that you understand it. If you send a RAW file from Aperture to Photo Stream — either automatically via the “import all” checkbox, or manually — and if that RAW file has no edits applied, then it’s the full-sized original RAW that ends up in Photo Stream. On the other hand, if it has had edits applied then Photo Stream ends up holding a JPG copy instead.
Creative Commons offers three licenses that allow others to re-use your material for non-commercial purposes. That material is mostly photos in my case.
It turns out, the least-restrictive one of those three - Attribution-NonCommercial (BY-NC) - is all you need if you only care about the “non-commercial” part.
That sounds kind of obvious, but I was confused by one other non-commercial license.
Here are the three licenses as described on the Creative Commons homepage, ordered from most-restrictive to least-restrictive:
Attribution-NonCommercial-NoDerivs (BY-NC-ND)
This license is the most restrictive of our six main licenses, only allowing others to download your works and share them with others as long as they credit you, but they can’t change them in any way or use them commercially.Attribution-NonCommercial-ShareAlike (BY-NC-SA)
This license lets others remix, tweak, and build upon your work non-commercially, as long as they credit you and license their new creations under the identical terms.Attribution-NonCommercial (BY-NC)
This license lets others remix, tweak, and build upon your work non-commercially, and although their new works must also acknowledge you and be non-commercial, they don’t have to license their derivative works on the same terms.
I want my photos to be available for the widest range of use-cases and people/institutions possible, as long as these use-cases are non-commercial and I get credited. I am fine with modifications of my work, so I didn’t need to use the most-restrictive BY-NC-ND license. For my photos, I chose the middle one: BY-NC-SA. The reason for choosing this one over the less-restrictive BY-NC license was, that I was not sure about this line from the description of that license:
[…]although their new works must also acknowledge you and be non-commercial, they don’t have to license their derivative works on the same terms.
I thought this meant, someone could use my photos, modify them the tiniest bit and then release it under any other license, including one that does allow commercial re-use.
After some research, I discovered that this might be a myth, as Terry Hancock writes:
The only real reason most people care about using “ShareAlike” with “NonCommercial” is because they think it protects them from commercial exploitation of the derivative works.
However, this isn’t necessary. Deriving from a work in order to make commercial use of the derivative is considered “commercial use.”
That describes exactly what I was worried about.
There are some more websites that seem to implicitely support this statement: Creative Commons’ own “Choose a License” page, Flickr’s Creative Commons page as well as this article on the SquidooHQ blog. Here are these parts (emphasis mine).
From Flickr:
Noncommercial means:
You let others copy, distribute, display, and perform your work - and derivative works based upon it - but for noncommercial purposes only.
From SquidooHQ:
You let others copy, distribute, display, and perform your work - and derivative works based upon it - but for noncommercial purposes only. You can also remix, tweak, and build upon the image, use it non-commercially, and license the new version under a different Creative Commons license if you so choose. The new license must be non-commercial.
However, none of these pages list any official sources from Creative Commons - at least not directly regarding these particular statements.
Eventually, I was able to find an answer, buried in Creative Commons’ Frequently Asked Questions. The table under “If I derive or adapt a work offered under a Creative Commons license, which CC license(s) can I apply to the resulting work?” clearly shows, that derivatives/adaptations of work which was originally released under a non-commercial license, can only be re-licensed for non-commercial purposes:
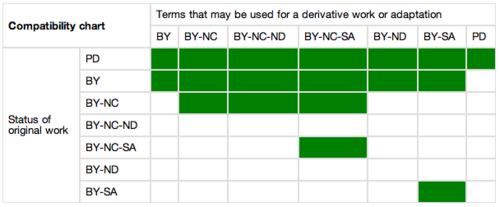
Now I finally feel comfortable using the least-restrictive BY-NC license without having to worry about that derivatives of my work might get re-licensed for commercial purposes.
Very comprehensive review of iPhoto for iOS. It explains a lot of details that might not be so obvious - including this one which I found confusing:
Pay close attention to these red “LEDs.” They signal that processor-intensive effects have been applied that are temporarily disabled while other editing is being done.
Works like a charm. And for your iPhone 3GS, too.
Since version 10.6 of iTunes you can stop syncing apps between your Mac and iOS devices without being prompted to delete all apps from the devices.
When you do that, the problem described in the article that you are prompted to remove iPhoto on every sync disappears and sync continues to work just fine.
Performance on the iPad seems to be normal. No problems so far. On the 3GS it is a bit slow when editing photos.
Recently, I upgraded NZ Walks Info to Rails 3 and Ruby 1.9.3. In order to run this new setup successfully, I needed to upgrade the Ruby version on the server. I chose ruby-build and the rbenv Ruby Version Manager to do so and would like to share some simple instructions that worked for me.
I am running the site on a Linode server running Ubuntu Linux 10.04. Here’s the software I use:
/usr/lib/rubyRuby was going to be upgraded to version 1.9.3 while the other parts stayed the same. However, Passenger 3 needed to be reinstalled to work with the new version of Ruby installed via rbenv.
I found this Gist by Ben Woodward with instructions on how to install rbenv system-wide. I figured, when installing it like this I would less likely run into permission problems.
Here’s the essential part of the Gist, adjusted to install Ruby 1.9.3:
# Install rbenv
git clone git://github.com/sstephenson/rbenv.git /usr/local/rbenv

# Add rbenv to the path:
echo '# rbenv setup' > /etc/profile.d/rbenv.sh
echo 'export RBENV_ROOT=/usr/local/rbenv' >> /etc/profile.d/rbenv.sh
echo 'export PATH="$RBENV_ROOT/bin:$PATH"' >> /etc/profile.d/rbenv.sh
echo 'eval "$(rbenv init -)"' >> /etc/profile.d/rbenv.sh

chmod +x /etc/profile.d/rbenv.sh
source /etc/profile.d/rbenv.sh

# Install ruby-build:
pushd /tmp
  git clone git://github.com/sstephenson/ruby-build.git
  cd ruby-build
  ./install.sh
popd

# Install Ruby 1.9.3-p0:
rbenv install 1.9.3-p0
rbenv global 1.9.3-p0

# Rehash:
rbenv rehash
Confirming that I am running the new version:
ruby -v
# ruby 1.9.3p0 (2011-10-30 revision 33570) [i686-linux]
Now I needed to update Passenger to work with the new version of Ruby. All there was to do was to install the passenger gem, following the instructions on their website:
gem install passenger

passenger-install-apache2-module
At the end of the installation, I got the configuration lines to paste into the Apache2 config file. I replaced my old settings with these updated ones:
LoadModule passenger_module /usr/local/rbenv/versions/1.9.3-p0/lib/ruby/gems/1.9.1/gems/passenger-3.0.11/ext/apache2/mod_passenger.so
PassengerRoot /usr/local/rbenv/versions/1.9.3-p0/lib/ruby/gems/1.9.1/gems/passenger-3.0.11
PassengerRuby /usr/local/rbenv/versions/1.9.3-p0/bin/ruby
The only thing that was missing to be able to deploy my Rails 3/Ruby 1.9 version of my app was to install Bundler:
gem install bundler
This was all that needed to be done to upgrade the Ruby version on my Linux/Ubuntu system using rbenv. I hope these instructions will help someone else, too.
Pow has just been released by 37signals:
Knock Out Rails & Rack Apps Like a Superhero.
Pow is a zero-config Rack server for Mac OS X. Have it serving your apps locally in under a minute.
Usually, there’s no configuration needed at all, but in order to get my old Rails 2.3.x apps running, I needed to “rackup” all of these. Following the Rails Guides instructions, I had to create a config.ru file with the following contents:
# RAILS_ROOT/config.ru
require "config/environment"

use Rails::Rack::LogTailer
use Rails::Rack::Static
run ActionController::Dispatcher.new
Then I was good to go.
Unless…
When I tried to symlink the app in the ~/.pow directory - as described on the pow homepage - I got the following error:
~/.pow $ ln -s /path/to/myapp
ln: ./: File exists
But that was easy. I just had to add the name of the symlink explicitly:
~/.pow $ ln -s /path/to/myapp myapp
Now, I was really up and running with my Rails 2.3.x apps and pow. Bye bye Passenger.
(Be sure to have a look at the documentation. It’s the best source code documentation I’ve ever seen.)
We have been lucky. We weren’t in Christchurch when the 6.3 earthquake hit just before 1pm on Tuesday, Feb. 22nd 2011. We were hiking through the mountains near Glenorchy/Queenstown (approx. 400km away to the south-west).
A hut warden was present on this track and he told us on Wednesday morning what has happened. He also offered us to make one call via radio (there’s no cell-phone coverage in NZ’s mountains). The connection was short, but we managed to reach our neighbours to ask if they are ok and if their and our houses are still standing.
Everything was ok, and so we went ahead with the normal plan and continued walking for the next couple of days.
Only after we came back on Saturday, we realized the degree of destruction this earthquake caused. It was terrible to see all the pictures.
We drove home on Sunday only to grab a few things and then leave again. We didn’t feel safe in our house on the hill, although it wasn’t looking bad on the outside. The inside was a bit of a mess, but we expected things to be worse.


At first, we spent two nights on a campground in western Christchurch, before my company organised flights for us to Auckland. We ended up staying there for almost 3 weeks in an unfurnished flat. It was not exactly comfortable, but still more comfortable than being in Christchurch, having no running water and sometimes no power. No shaking was a big bonus, too.
We returned last Sunday. Wednesday evening I went out with my GF1 to take some pictures of the visible damage in Sumner, the suburb we live in.
I need to say that most buildings are looking ok and that you don’t see lots of obvious major damage everywhere. But you certainly won’t overlook it, either.
 Recovering after the earthquake: The time on the Sumner clocktower is the one when the earthquake happend. Just before 1 PM.


 You see quite a few of these Port-a-loos in the street. Water was not available first (it is restored now), and the sewage system is still not running properly again.

Sumner Church had some considerable damage after the quake in September, and the Febuary one made it worse.

Water tank: before running water was restored, you had to get water from one of these tanks.


A huge rock came down from the cliff in the background.


The Cornershop Bistro. Awesome restaurant where we spent a lovely evening not long ago.


“The Ruptured Duck” restaurant was heavily damaged after the September quake and this one now put it over the edge. It was still standing after the quake, but got demolished now.

zrick buildings are often hit worst.

Some properties are now a bit too close to the edge.


Where’s the roof?
You can see all the pictures in my Flickr set “Earthquake damage in Sumner”.
“The best software should be understated and unobtrusive.”–
Programming is not a craft « DanNorth.net
An absolute must-read!
(via Instapaper)
Behind the TEDTalk 2010 from m ss ng p eces on Vimeo.
Behind the TEDTalk 2010 – video by mssng peces (via altnytterfarlig)
“[Birds] are not all smart - there are too many species and variations for that - but the smart ones are as impressive as a toddler who can fly.”– Alex Vlack in the epilogue to Andrew Zuckerman’s “Bird”
When I am creating a new feature for an app, I sometimes realize halfway through that the way I am building it, is not the proper way to do so. Or the specification changes. Or there was a misunderstanding. Or there’s an unexpected bug that needs to be fixed and go onto the production server as soon as possible.
Then, when you did all development on the main branch (we use Git, so that’s the master branch in that case), undoing things and/or doing a quick deployment can get very inconvenient. You can’t just deploy a quick bug fix, because all other half-finished features and fixes would have to be deployed, too. You can’t easily revert the existing commits for that feature, especially if the commits are mixed with all the other commits of unrelated features.
A good way to get rid of this problem is to create a local feature branch every time you want to work on a new feature. That branch doesn’t need to be pushed to the remote repository on the server. It’s just for you.
Then, all development for that feature happens in this branch exclusively. For every new feature a new branch is created. After a feature has been implemented completely, merge it back to the master branch (or whatever branch is appropriate). With Git, that’s super easy:
# create a new branch new_feature based on master and switch to it
git checkout -b new_feature master

# when you're done, merge it back
git checkout master
git merge new_feature

# when you are sure everything is working properly
# and no further work needs to be done for this feature,
# you can delete the feature branch again:
git branch -d new_feature
Too often I thought, “I won’t need an extra feature branch for that”. But all it takes is one simple Git command to create one (and it’s probably equally simple in other modern DVCSes). It will make your life easier when coding new features.
If you decide you want to discard all the development on a particular branch, except for one or two commits, you can cherry pick these commits from the discarded branch:
# say, you have a commit 'bd42c4e7' you would like to keep
# switch to the branch you want to copy the commit to
git checkout master

# copy it
git cherry-pick bd42c4e7
Update: there’s a nice post on the Giant Robots blog which I like to recommend for further reading: Streamline your git workflow with aliases.
“For example, the word “Google” is usually the top query at other search engines, and words like “Yahoo” and “Bing” score high on Google. Why, oh why, do people search for a website if they already know its name? Why not just type, say, www.bing.com into the URL field?”–
Mental Models (Jakob Nielsen’s Alertbox)
Have you ever asked yourself this question? Have you ever given computer support via phone? Have you ever wondered why “normal” people do not understand the simplest most obvious things when it comes to software? I know I did!
This article will give you some explanations.
Here’s part of the explanation for the question above:
The reason is that many users have never formed an accurate model of how the “type-in boxes” on their screen function. When they type stuff into a box, they sometimes get where they want to go. What to type where and exactly how each type-in box functions, however, are often beyond their ken.